
Well, better late than never I guess.
Happy Easter everyone
{hugs}
Laura

I use cotton yarn with a crochet hook size specified for the yarn.
I also crochet very tightly.
Start with a magic ring 

and hook 6 single crochet into it. 

Then, pull it tight and slip stitch into the first single crochet to join.

Second Round - Chain one and then hook 2 single crochets in each stitch. Slip stitch into the chain one to join.

Third Round - Chain one. Hook a single crochet in the first stitch and two single crochets in the second. Repeat (1 sc, 2 sc, 1sc, 2 sc) until you get to the end of the round and slip stitch into the first single crochet. 

Fourth Round - Chain one. Hook one single crochet into each of the first two stitches and then two single crochets into the next. Repeat (1 sc, 1 sc, 2 sc, 1 sc, 1 sc, 2 sc) until you get to the end and the slip stitch into the first single crochet.

Now you will make the head of the bunny.
Chain one and then hook a half double crochet and a
treble crochet into the next stitch.
In the next two stitches, hook two treble crochets in each stitch.
Then, in the next stitch, hook one treble crochet and one half double crochet.
(1 hdc + 1 tc, 2 tc, 2 tc, 1 tc + 1 hdc) 

Now, chain one and then slip stitch around the body of the bunny until you get to the first treble crochet (your last slip stitch will be in the first treble crochet).

Now, you will chain 5. 

In the second stitch from your hook, create a half double crochet. Then hook one double crochet in each of the next three stitches.

Slip stitch into the top of the third treble crochet and chain 5

then, half double crochet in the second stitch from the hook and three double crochets in the next three stitches. Slip stitch into the top of the sixth treble crochet and slip stitch into the next two stitches. Leaving a long tail, cut
your yarn and tie off.

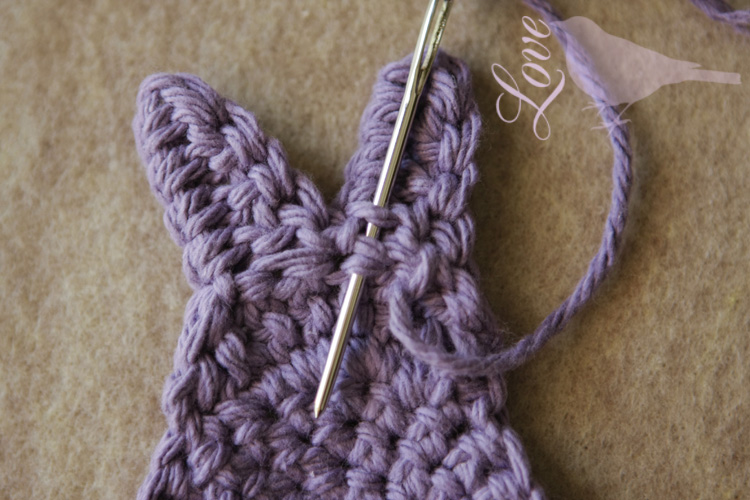
Now you need to slip stitch the ears to the head by going through the double crochet of the ear and into the top of the treble crochet of the head. 

Do this twice for each ear and then weave in your yarn and cut. 
For the tail you will be creating a bobble stitch. First you will chain two. 

In the first chain you will hook the first half of four double crochets. This will leave 5 loops on your hook. 

Now, yarn over and pull through all five loops 

and then yarn over again and pull through to finish, cutting your yarn leaving a tail and then pulling tight. 

Pull the yarn tails of the tail in a spot just above and below the center point of the body 

and tie together tightly, weaving in the ends. 

A pretty spring bunny...


Love it!
ReplyDeleteTania
When you say, "Then hook three double crochets in the next three stitches." guess what? I had to "rippit" because I did 3 dc in next 3 stitches! Hook dc in next 3 stitches would have been better :)
Deleteoooohhh, I can see what you mean. thanks for the help :)
DeleteLaura
Sew a safety pin to back. cute for young children, I made for my grandaughter's class.
DeleteThanks for sharing this cute little pattern. I intend to make a few, glue or stitch a jewelry pin on back so it can be worn on clothing. Will give these out to the little people in the church. Hammah
DeleteVery cute!! Great project!
ReplyDeleteMaria x
Thank you SOO much for this! :D It's after 9am Sunday morning, but I've got to make some! :)
ReplyDeleteI wanted to make a bunny garland but being new to crochet its not something I could work out for myself so thanks! What brand of cotton did you use. The colours are lovely and when I was looking in a yarn shop on Saturday I was disappointed that the cotton colours were either drab or too 'lime'. Lily. xxx
ReplyDeleteAbsolutely love this! Thank you for sharing how you did it! I know JUST how I want to use this! Oooooo, I can't wait! Happy Easter to you!
ReplyDeleteI love the bunnies- -and so happy you made a tutorial- -I MUST try it now!! They are sooooo cute!!
ReplyDeleteThank you so much for this pattern. I just made one little bunny. I love it!
ReplyDeleteHi Laura, thanks for this lovely tutorial!!!! Your step by step instructions and foto's is very professional. xxxxxx
ReplyDeleteI must try it!!! it's very cute!
ReplyDeleteThanks for showing us how to do it :)
I think this is really cute, and would love to grab the pattern so I can make it next spring, before Easter. Is there a printable version, without most of the pictures, or a downloadable version, again with only one picture?
ReplyDeleteThan you from Poland! :)
ReplyDeleteThis would make a cute Lapel Pin, or even take it and put it in those plastic Easter eggs as a gift for the kiddies when they hunt Easter eggs.
ReplyDeleteWhen I got to the ears, they somehow began to curl. where did I go wrong?
ReplyDeleteAre they curling from the top of the head to the tip of the ear or from side to side? Check to make sure you aren't crocheting to tightly, it's the only thing I can think of that would make it curl. Good luck :)
DeleteThese are totally adorable! Great little, quick pattern! So glad I found this before this years Easter. I will be posting a link to your blog for this hunny bunny garland for everyone that comes to my blog. :'}
ReplyDeleteSo cute, thanks!!! I too had the ears curl then I realized I was reading your pattern wrong. Where you said 3 double crochets in the next 3 stitches, I put 3 in each! Then I looked at your picks and saw my mistake. I am going to try it on a white crocheted baby cap and see how it looks!
ReplyDeleteKim
Thanks from FRANCE !!!
ReplyDeleteI have made one yet!!!
I just found you and when I saw the behind version of your bunny I lol'd. Must make a few. Thank you, your patterns are very nice. Good color.
ReplyDeletelol... thank you for commenting, you have made my day.
DeleteSuper cute and quick to make. Thanks for the pattern!
ReplyDeleteThank you so much for this precious pattern! I have been looking for something Easterish and not too difficult while recuperating with a broken leg. Thanks for all the pics, definitely helped with my pain med fogged mind.
ReplyDeleteI'm glad you like the pattern. I hope you're feeling better soon.
DeleteLaura
I am reblogging your posts with the Bunnie and Owl patterns.
ReplyDeleteThank you for taking the time to write and publish the tutorials.
Ta Ta for now, Cathy the Bagg Lady
http://raggz2baggz.com
Ohhh, wonderful. I can't wait to see them...
DeleteI just found this bunny and love it. Had to make one last night. Only one problem - and maybe you can help me. I'm left handed and I had trouble when I got to the ears. But, I improvised and made it work. But, do have any help on this.
ReplyDeleteJust made a dark pink bunny. I love it!!! Thanks so much for sharing the pattern. Off to make the owl now.
ReplyDeleteI had one of these when I was little, and it had a pin on the back so you could wear it too.
ReplyDeleteOh, the cuteness ! I love these
ReplyDeleteThanks for the pattern, going to try and get a bunny garland made for easter table saturday
ReplyDeletehave you any more motifs/appliques up your sleeve??
Thanks for this pattern
ReplyDeleteAdorable! thank you for sharing the pattern!
ReplyDeleteOMG this is so cute - thank you for the tutorial! I am your latest reader!
ReplyDeleteThank you...
Delete{I love that Easter is almost here again}
Glad you like the pattern.
Can't you make it so you can just print pattern without all the pictures?
ReplyDeleteI am a newbie to crocheting. I have tried making these adorable bunnies, but the bodies curl slightly into a bowl shape. Can you please tell me what I may be doing wrong? Thank you!
ReplyDeleteHi Sheri,
DeleteYou are probably just crocheting too tightly (a problem I have all the time). When I am unhappy with the tightness, I use one size bigger hook.
Good luck.
Laura
Thank you! I'll give that a try!
DeleteSo cute! Thanks for sharing. Will probably use this pattern for a bookmark. :)
ReplyDeleteA bookmark is a great idea...
DeleteThanks from Argentina!!
ReplyDeleteLaura thank you so much, this was the most absolutely.the most easiest instructions I have ever been able to follow. I made the bunnies for my grandchildren. Much love from Texas ;)
ReplyDeleteThank you Annie
DeleteLove your bunnies !!! I made some of them and put your link on my blog !
ReplyDeleteHave a Happy Easter !
Thanks for sharing !
Anna
Thank you Anna. Your bunnies are so cute; I love the cards you put them on.
DeleteVery cool! I linked to it on my blog! :D Thanks!
ReplyDeleteIts so cute I love bunnies I made one in violet
ReplyDeleteI put your link on my blog ( http://vpsartisanal.canalblog.com/archives/2014/04/27/29749625.html)
Thanks for sharing
Much love from France
Brigitte
"3 dc's in each of the next three sts" is your standard crochet term
ReplyDeleteThank you for this tutorial Laura, I just started to crochet and I looking for easy patterns.
ReplyDeleteI will stay here to follow your blog.
Big hug from Spain
Rosario
Thank you Laura for this gorgeous tutorial..... I'll be making a string of these for a gift to dress a nursery.
ReplyDeleteCrafty hugs from England
Hi Laura,
ReplyDeleteI just found your nice tutorial while searching the internet for cute Easter ideas yesterday. I've just finished the first bunny. It is so cute and not complicated to crochet by following your explanation step by step. Thank you so much for this great tutorial. It is gorgeous. I'll join your site as a follower.
Have a nice week-end. Hugs from Germany, Bianca
Made these cute bunnies into a garland, thanks for sharing your cute patterns
ReplyDeleteMake two bunnies, but put the tail on only one. Then sew them together and stuff as you are sewing for tiny stuffed toys. Thanks for the pattern. I have been crocheting for 62 years and this is the cutest and easiest bunny to crochet. My grandma taught me how to crochet when I was ten years old! Love it.
ReplyDeleteLove making these lil critters - makes nice magnets and pins - donate them to senior centers for prizes and kindergarten class just love them. Use my scraps from washcloths/hot pads.
ReplyDeletelovely bunny, thanks :)
ReplyDeletethough you lost me here: "Now you need to slip stitch the ears to the head by going through the double crochet of the ear and into the top of the treble crochet of the head." can't even make it out in the pics. could you pls help?
thanks a lot :)
You're using a yarn needle and the yarn tail to secure the ear to the head. Sorry for the confusion.
Deletethank you :)
DeleteI can find no way to print this out? It will not even copy How?
ReplyDeleteYou can find a printable version here....
Deletehttp://lovethebluebird.blogspot.com/2014/03/crochet-spring-bunny.html
fab making some and the owls
ReplyDeleteSad to have to tell you that someone is passing your pattern off as her own: http://threadtheloveblog.blogspot.co.uk/2017/01/bunny-garland-free-pattern.html
ReplyDelete^ What they said :( It's so wrong! She is threadthelove on instagram.
ReplyDeleteHello,i have also noticed that Threadthelove is passing off this exact pattern as her own. This is not the first time she has claimed a pattern as her own to make profit from it. I saw your request for her to remove it but it is still on her blog.
ReplyDeleteHi I have only just found this lovely cute pattern, I am sewing it on a crochet small colourful bag, and will put tiny eggs in it for our great grandchildren.
ReplyDeleteThank you for the pattern tutorial.
Regards
first let me say thank you for this lovely pattern. It is absolutely adorable.
ReplyDeleteI have a question though, when you say " hook two single crochets in a stitch" are you referring to join two sitches? I'm sorry, I'm not not familiar with that term.
Thank you
Or does it mean two stitches in a single stitch?
Deleteyou're welcome page. it's two single crochet stitches in the single crochet stitch from the previous row.
Delete